Introduction
Address Book is a fantastic feature within Mobile Marketing Cloud that makes managing and importing contacts a breeze. Whether you're uploading a file or entering details manually, Address Book simplifies the process, keeping your contacts organized and easy to find. This guide will help you through the steps to import and update your contacts using Address Book.
Supported File Formats & Limits
Address Book allows you to upload file (max 60 MB) in the following formats:
-
.csv (Comma-Separated Values)
-
.xlsx (Microsoft Excel)
-
.xls (Microsoft Excel Legacy)
-
.ods (OpenDocument Spreadsheet)
Note: The more records in your file, the longer the upload process will take.
Steps to Import Contacts
To successfully import contacts into Address Book, follow these essential steps:
-
Begin with a blank sheet in a spreadsheet program like Microsoft Excel or Google Sheets, ideally saved or exported as a comma-separated value (CSV) file.
-
Make sure certain fields, such as phone numbers, are formatted correctly.
Import New Contacts
Importing contacts involves two main steps:
-
Preparing your spreadsheet document outside of Mobile Marketing Cloud.
-
Importing the file to upload contacts to Address Book.
Prepare Your Document for Import
-
Open your blank worksheet in a spreadsheet program like Excel or Google Sheets.
-
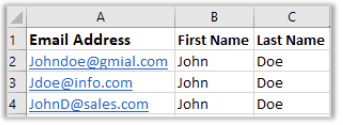
Create and label a column for a communications channel, such as Email Addresses.
-
Next to your Email Address column, create and label additional columns for first names, last names, and any other information you wish to import to the Address Book.
-
Paste your contact information into the appropriate fields in the spreadsheet.
For example:
Import to Address Book
-
In the platform, click on the nine dots menu in the upper right corner. Scroll down to the 'Other' section to find Address Book.
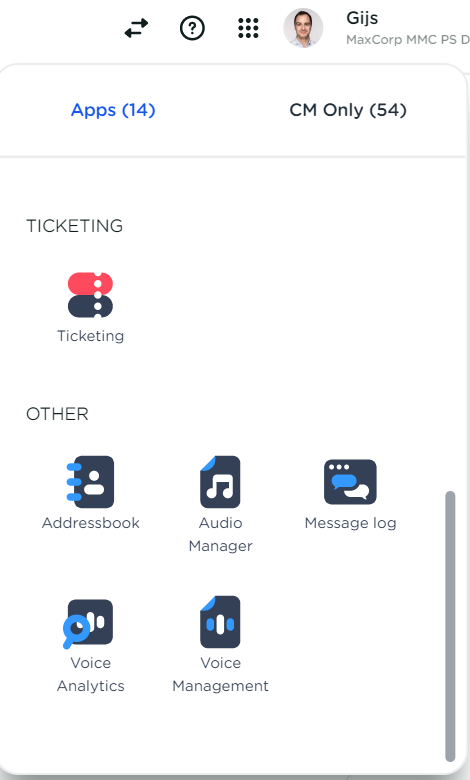
-
Click on the Address Book icon to open it.
-
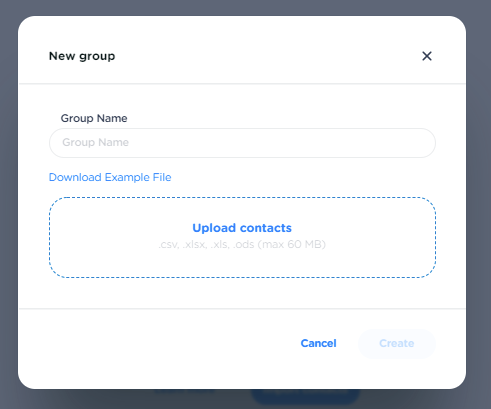
Click on the + button on the right:

-
Assign a group name for your import, like 'newsletter subscribers'. If you prefer, you can leave this blank, and the group name will default to the name of the uploaded file.
-
Click on upload contacts and select the file from your computer.
-
Match the columns in your import file to the fields in your Customer Data Platform. We’ll automatically match columns with recognized names for you. For instance, the column containing email addresses will match with EmailAddress. If the pre-matched field isn’t correct, or if you want to select a different field type or skip a column, just click on the selected field. Repeat this for all unmatched columns you wish to import.

-
Once all document headers are matched with the correct fields, click on next.

-
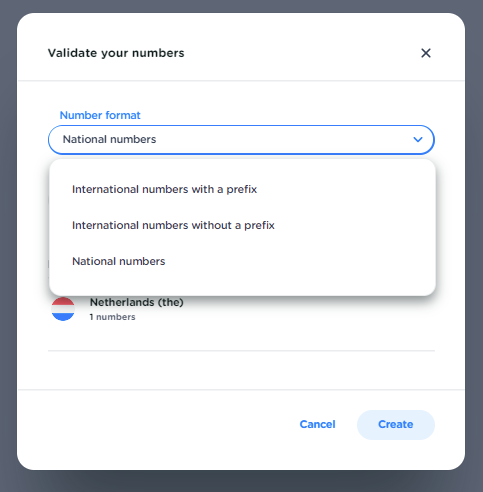
Validate your numbers by clicking on number format and selecting the format you used in your file:
-
International numbers with prefix: Choose this if you used a prefix, country code, and subscriber's number in your formatting. In the Netherlands, this would look like +31 12345678 or 0031 12345678.
-
International numbers without a prefix: Select this if you used the country code, national destination code, and subscriber's number in your formatting. In the Netherlands, this would look like 31 6 12345678.
-
National numbers: Choose this if you only used the National destination code and subscriber number in your formatting. In the Netherlands, this would look like 06 12345678. Then select the preferred country prefix to finalize the phone numbers.
-
-
If you can't validate your number, you can choose to ignore the errors (only do this if you don’t need the numbers for communication).
-
When you have validated your numbers or ignored the errors click on the 'Create' button.
Finished! 🎉 You can now use your imported contacts to communicate, such as through SMS or email.