
Add Kiosk
This guide will walk you through the process of adding and configuring a kiosk in your point-of-sale (POS) system. A kiosk is a self-service terminal that allows customers to interact with your business, such as placing orders or purchasing tickets. Follow the steps below to set up a kiosk and customize its settings.
Steps to Add a Kiosk
Access the Kiosk Settings
Navigate to the kiosk management section in your POS system.
Click the "Add Kiosk" button to open the kiosk configuration window.
Configure the Kiosk Settings
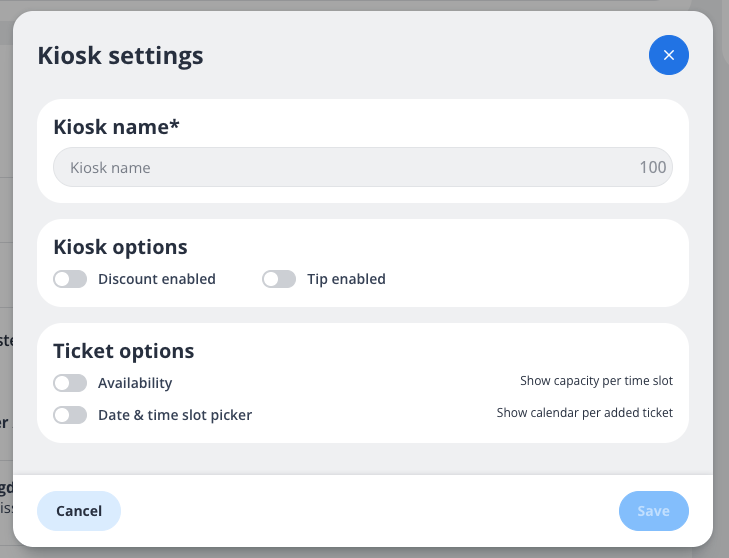
After clicking "Add Kiosk," you will see the Kiosk Settings screen. This screen allows you to customize the kiosk's functionality. Below is a breakdown of the available options:
Kiosk Settings Breakdown
1. Kiosk Name
Field:
Kiosk name*Description: Enter a unique name for the kiosk. This name will help you identify the kiosk in your system.
Character Limit: 100 characters.
Required: Yes (indicated by the asterisk
*).
2. Kiosk Options
Discount Enabled: Toggle this option ON if you want the kiosk to allow discounts on transactions.
Tip Enabled: Toggle this option ON if you want the kiosk to allow customers to add tips during checkout.
3. Ticket Options
Availability: Toggle this option ON to display the capacity per time slot for ticketed events or services.
Date & Time Slot Picker: Toggle this option ON to enable a calendar view, allowing customers to select specific dates and time slots for their tickets.
Actions
Cancel: Click this button to discard any changes and close the kiosk settings window.
Save: Once you have configured the settings, click this button to save the kiosk and apply the changes.
Notes
You can always edit the kiosk settings later if needed.
Ensure that the kiosk name is descriptive enough to differentiate it from other kiosks in your system.
By following these steps, you can successfully add and configure a kiosk in your POS system. If you encounter any issues, please contact support for assistance.