Once you’ve clicked to create a new Agent or edit an existing Agent, the Agent Editor will open. Inside this screen you will get the option to edit the Agent’s Name and Behaviour, and will be able to see the Agents' Workflow. This page explains what these concepts mean and how you can work inside the Agent Editor.
Analogy
First, an analogy for creating agents that makes it all click! In this video, we explain the process of building AI agents by comparing it to something we all understand: hiring a new colleague. This analogy helps break down the complexity of creating agents into familiar, relatable steps—like writing a job description, conducting interviews, onboarding, and providing feedback. By thinking of agents as team members, it becomes clear why it's so important to define their roles, set expectations, and ensure they align with your organization's goals and values. This approach not only simplifies the process but also ensures your agents are effective, scalable, and a perfect fit for your brand. Let’s dive in!
Agent Name
In the Agent Editor, you can assign a name to your Agent. Choose a name that is appropriate and aligns with the Agent’s purpose.
Agent Behaviour
In the Agent Editor, you will define the Behaviour you want your Agent to exhibit. This Behaviour can be written in natural language and describe the process you are trying to automate with your Agent.
Tips for Defining Agent Behaviour
-
Start with context: Describe the Agent’s general purpose and the process it aims to automate.
-
Outline step-by-step instructions: Use a clear, sequential format, such as: “Start with gathering information X, and continue with process Y”
-
Be explicit and precise: Clearly specify what you want the Agent to do.
-
Keep it concise: Avoid overly long instructions, as this can hinder the Agent’s performance.
If the process you want HALO to handle involves many steps, consider breaking the process up it into multiple Agents using Agent Handovers, which are explained below.
Options for the Agent
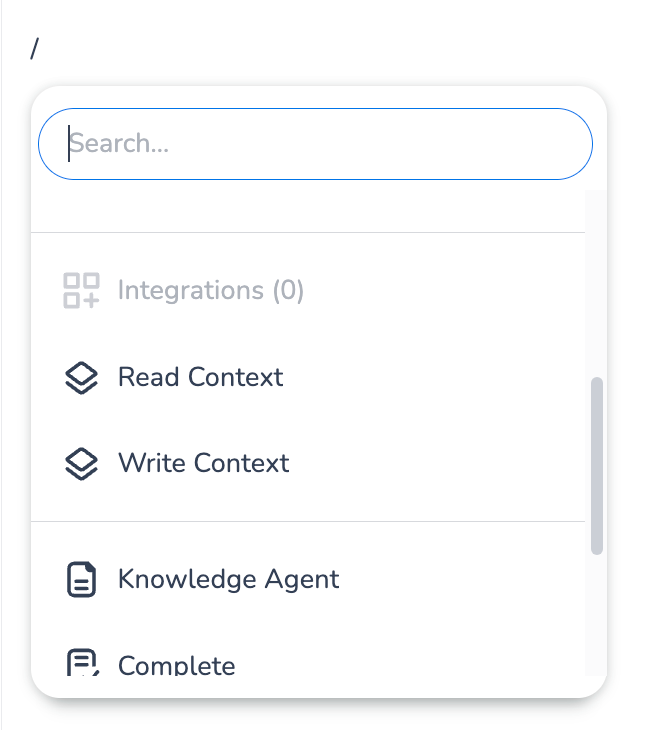
Within the Agent Behaviour, you can reference various HALO functionalities using the / command. This will display a list of options you can incorporate into your Agent.
Clearly define the conditions under which each functionality should be used.
For all the options described below, it is very important to describe in your Agent the conditions under which the functionality should be used. Do not simply add functionalities to the Agent, but clearly mention when and how the functionality should be used. This will greatly help the Agent in the decision making.
Agent Handover
Agent Handovers enable you to create complex multi-agent systems by allowing one Agent to reference another within its Behaviour. When a query requires specialized handling, the current Agent can pass control to a more suitable one.
This feature is particularly valuable when managing multiple distinct processes or when an Agent's instructions become too extensive. To enable these seamless transitions between Agents, simply configure Agent Handovers within an Agent's Behaviour.
When an Agent decides to do a handover to another Agent, the following happens:
-
The current Agent does not handle the query but simply forwards the query to the new Agent.
-
The new Agent takes over and tries to address the query. The new Agent will also get the conversation history between other Agents and the user to work with.
-
If this new Agent can address the query, subsequent queries will first be handled by this new active Agent.
For example, when using HALO to automate support queries, you might create specialized Agents for different functions:
-
One for answering general questions
-
Another for creating orders
-
A third for retrieving order information
Breaking down complex processes into smaller, focused Agents can improve performance and consistency of the Agent.
Tools
Agents can use Tools to perform many custom actions. More information on Tools can be found on the Tools page. You can allow an Agent to use a specific Tools by simply inserting it in the Agent Behaviour, again using the / command.
Guidelines for Using Tools
-
Explicitly state the conditions under which the Tools should be used
-
Clearly document the Tools’s name, description, and parameters in the Tools section.
If Tools parameters are not consistently requested to the user by the Agent, explicitly mentioning how the Agent should collect these parameters by the user in the Agent Behaviour can help.
What happens when the Agent decides to use a Tool
-
The Agent signals HALO to execute the Tool in the background.
-
HALO handles executing all the steps in the Tool.
-
Once the Tool finishes, its result is returned to the Agent.
-
The Agent interprets the result and proceeds accordingly, by either returning something to the user, or performing another action.
If an Agent decides to call multiple Tools simultaneously:
-
HALO will execute them in parallel, at the same time.
-
It will wait for all Tools to finish and send the result of these Tools back to the Agent, which will interpret these and proceed accordingly.
If a Tool that is called by the Agent fails for any reason, a error message indicating that the tool failed is returned to the Agent. It may be valuable to define in your Agent what it should do in this situation.
Context
Read Context
When a ‘Read Context’ reference is added to an Agent Behaviour, this context reference will be simply replaced by the context definition when the Agent is executed. In order to ‘Read Context’, use the / command to get context:
Note that it important to explain what this context means inside the Agent Behaviour.
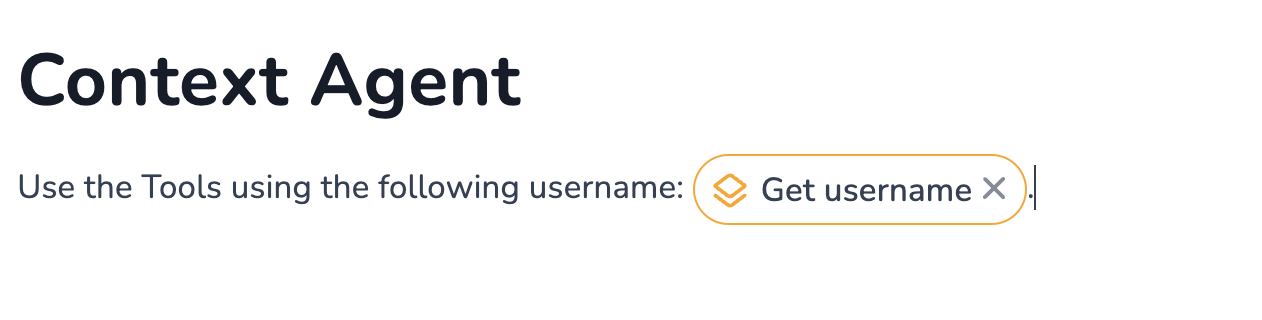
Avoid using vague context references in your Agent Behaviour like:
“Use the following context: Context: username”,
which will be read by the Agent like:
“Use the following context: example_user”
Instead, clearly explain what the context means in the Agent Behaviour:
“Use the Tools using the following username: CONTEXT: username”
Write Context
As previously discussed, the "Read Context" option is replaced by the context definition value, which can either be the default value or the value provided via a HALO API call. In addition to these options, you can allow agents to analyse the current conversation and determine how to set the context in a specific way. This capability can be enabled for agents by using the "Read Context" tool. Note that you are not allowed to write to system context variables.
This approach allows you to dynamically set contexts. Here's an example:
-
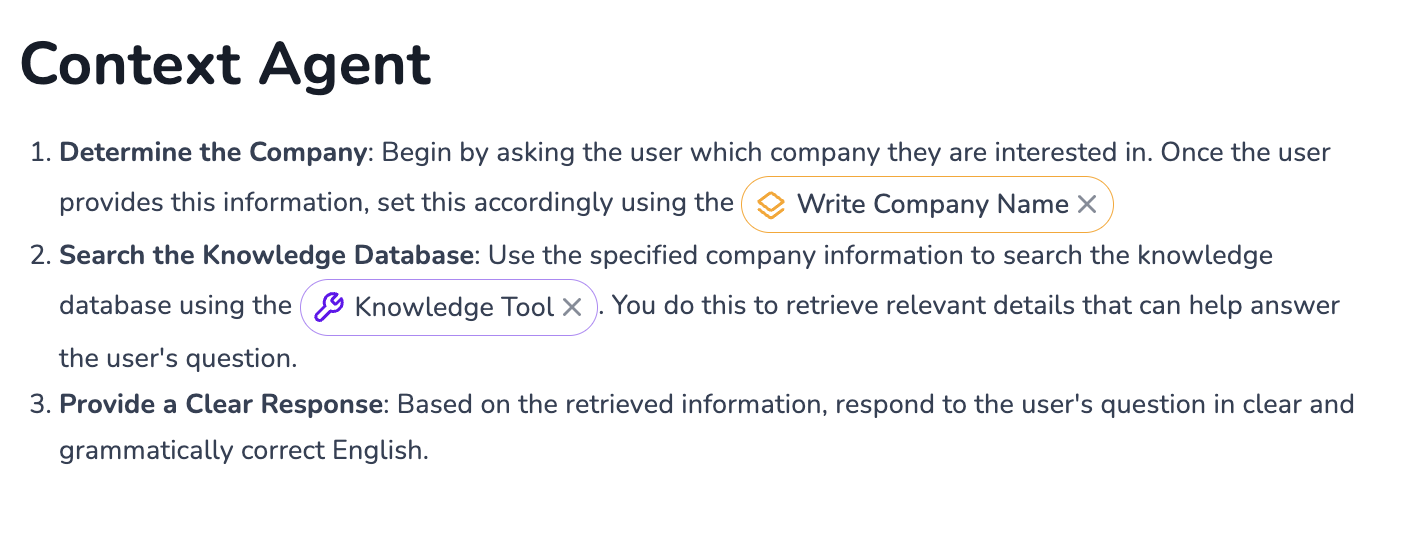
Add context labels to specific knowledge sources (refer to the Knowledge Page for more details). For instance, you could assign a label to a knowledge source specifically tailored for Company A, and a source for Company B. The context label would look like this:
company_brand = Company Aorcompany_brand = Company B. -
The agent can then identify the company the user is interested in and use the "Write Context" tool to set the
company_brandcontext. -
Finally, a Knowledge Tool (refer to the Knowledge Tool Step Page for more details) can be created to search the knowledge base for relevant information, taking into account the context that has been set.
Knowledge Search
For more information, full examples, and JSON result formats, see: Knowledge Search
With the Knowledge Search functionality in HALO, you can search through your Knowledge and generate an answer.
The Knowledge Search option will, using a query as input, search through your Knowledge to find the most relevant Sources and try to generate an answer. There are three possible outcomes:
-
Answer: HALO found enough information to answer the question.
-
Clarifying Question: The query is too vague or ambiguous.
-
No Answer: No sufficient information was found in Knowledge.
How to use it
Since the result from the knowledge search is relayed back to the agent from which it is called you can make changes to how to knowledge should be presented to the end user. Some quick tips are:
-
The calling agent should treat the
responsefield from knowledge search as text ready to send to the end user. -
The agent can be instructed to relay knowledge search results strictly (relay verbatim) or have customized behavior. You can for instance:
-
shorten or rephrase answers
-
add source URLs from
sources -
handle
no_answerby handing over to a live agent or showing a custom fallback -
handle
clarifying_questionby relaying it to the user as is or adjust.
-
The Knowledge Search is date‑ and time‑aware via the current_datetime system context, so Knowledge Search can answer time‑sensitive questions (e.g. “Are you open today?”) using the correct local time.
Breakout
You can use the Breakout functionality in an Agent Behaviour to describe the conditions under which the Agent cannot handle the query and should not process it. This is useful for queries outside the Agent’s scope or for specific scenarios where the Agent should not respond.
When a Agent determines it needs to Breakout, the query is passed to the Root Agent, which tries to answer the query next. Next to this, HALO marks that the Agent could not be used to answer the question, which is shown under the Agent Analytics.
It is considered good practice to define the limits of your Agents using Breakouts. This helps the Agent know what it can help the user with, and which queries the Agent should not handle.
For example, the Breakout can be used in the following way to define limits for the Agent:
“You are an Agent that will handle all general questions using Knowledge Agent. For all other questions, use Breakout.”
If an Agent breaks out and the query is handed over the Root Agent, and this Root Agent hands the query over to the same Agent again, we have reached a type of recursion. To prevent an infinite loop of Breakouts and Handovers, HALO will generate the Fallback Response when such a loop is detected.
HALO will also immediately generate the Fallback Response if the Root Agent breaks out, as it is not possible for the Root Agent to break out to itself.
Complete
You can use the Complete functionality in an Agent Behaviour to describe when your Agent has successfully completed all his tasks completely. This is useful for queries outside the Agent’s scope or for specific scenarios where the Agent should not respond.
When a Agent determines it needs to Breakout, the query is passed to the Root Agent, which tries to answer the query next. Next to this, HALO marks that the Agent could not be used to answer the question, which is shown under the Agent Analytics.
An Agent cannot both provide an answer and Complete simultaneously, it can only do one of these two things at the same time. To accommodate for this, avoid writing:
“After completing the process, return a success message and Complete”
Instead, separate the actions of the success message and Complete functionality:
“After completing the process, return a successage message. If the user responds positivly to this, Complete”
Agent Editor Shortcuts & Formatting Guide
The agent editor supports rich text formatting through keyboard shortcuts and markdown-style syntax. Use these features to structure your agent instructions efficiently.
Quick Tips
-
Use
/for references - The command palette is the easiest way to insert tools, agents, and contexts -
Markdown shortcuts - Type
#,-, or1.+Spaceat the start of lines for quick formatting -
Reference Management - Press
BackspaceorDeleteto remove inserted references (tools, agents, contexts) -
Agent Name Field - Press
EnterorTabto move from agent name to instructions -
Undo - Use
Cmd/Ctrl + Zto undo actions -
Mix and match - Combine keyboard shortcuts with markdown-style typing for efficient editing
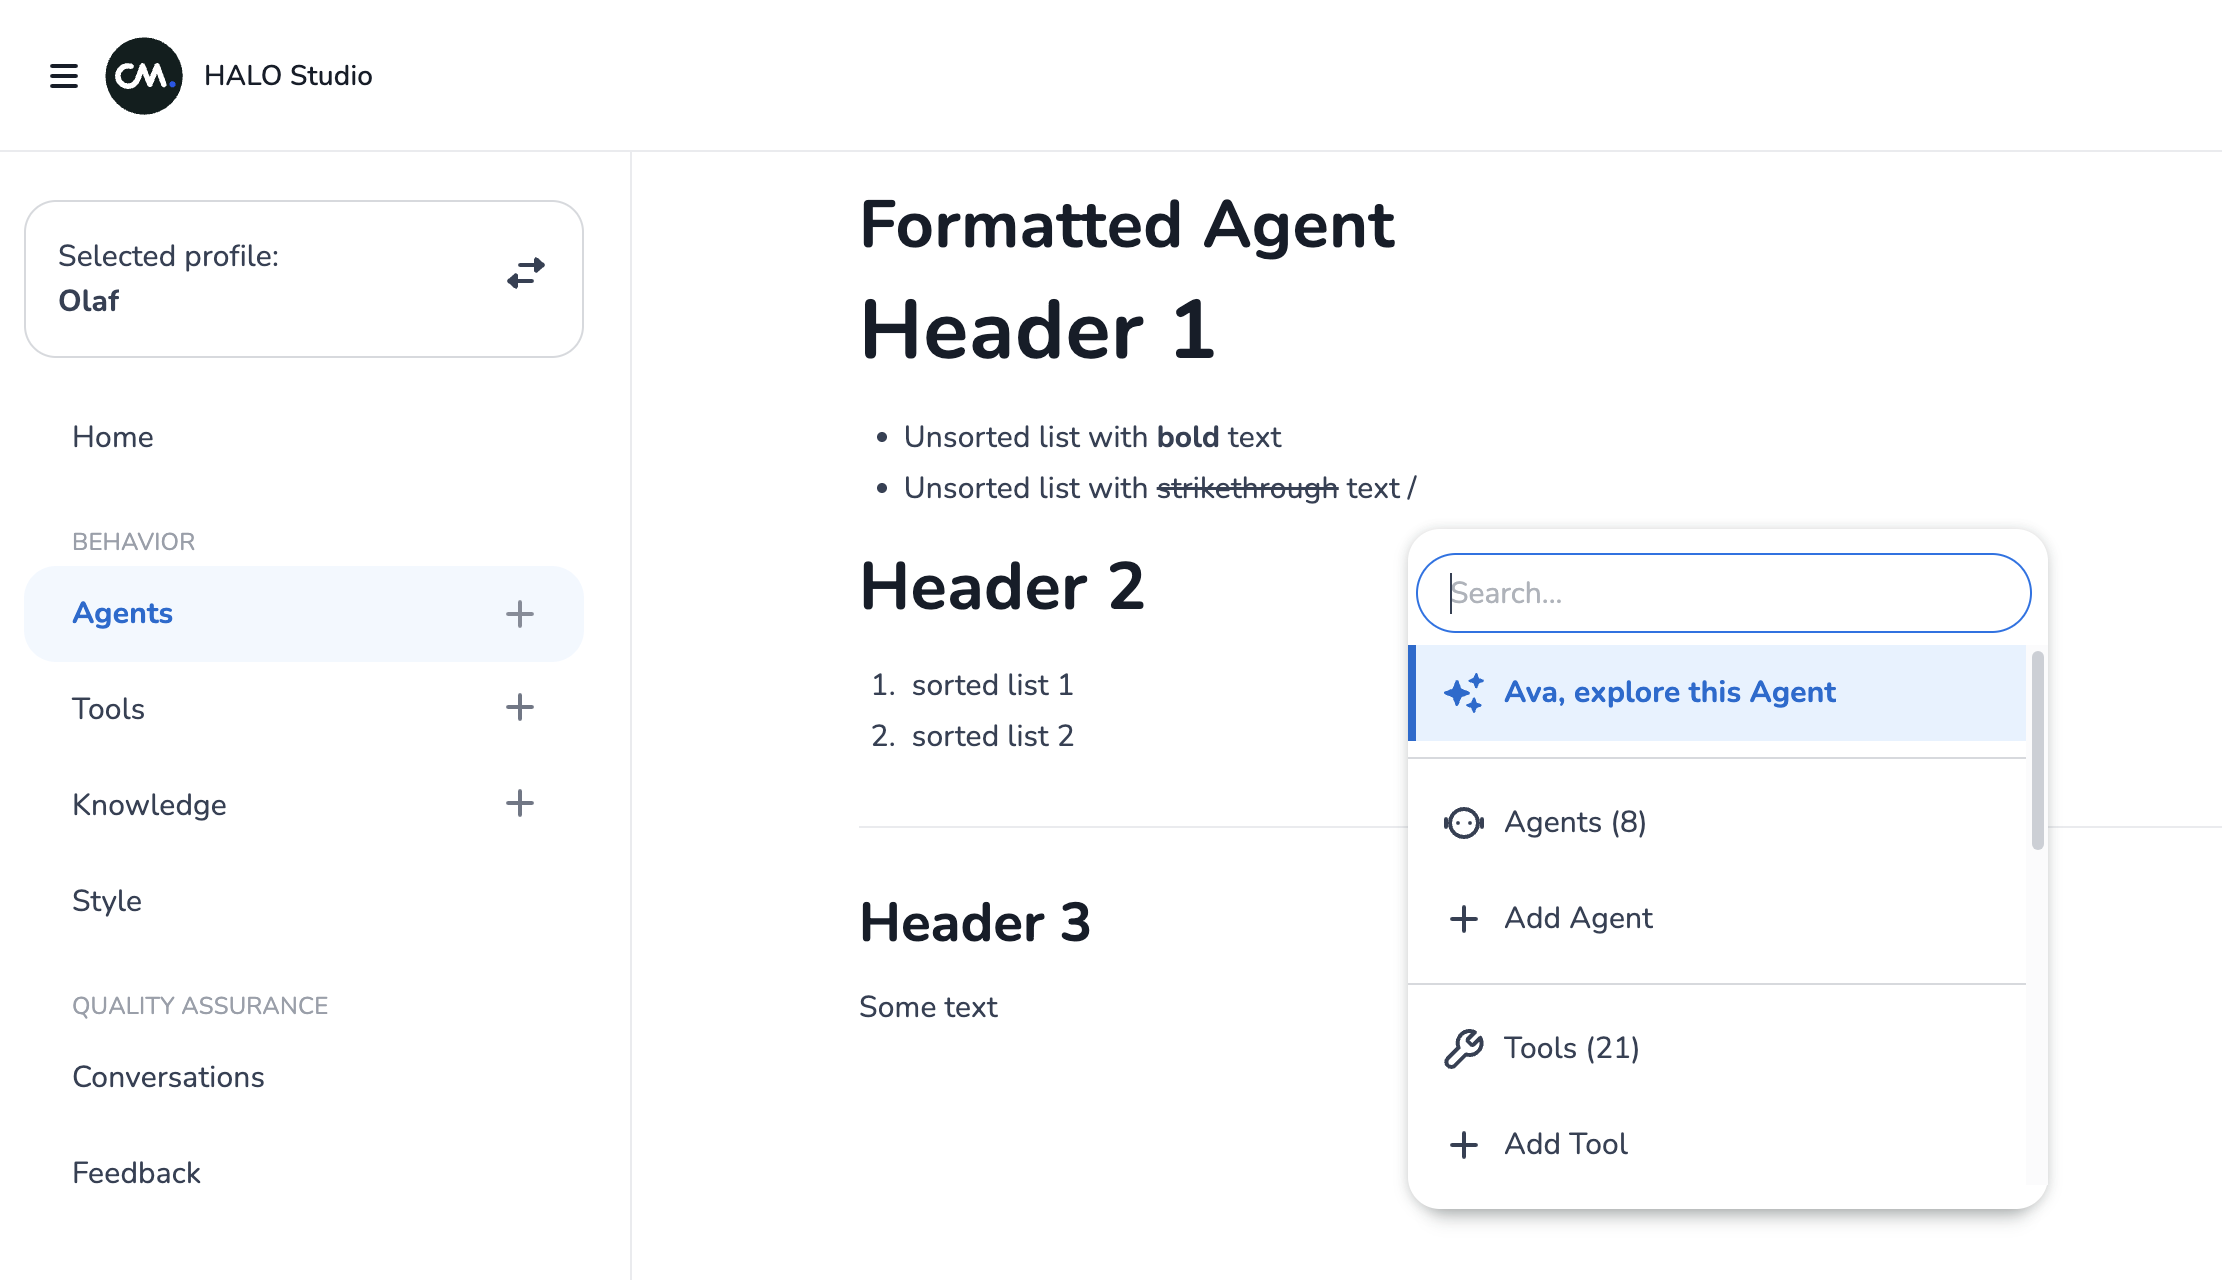
Command Palette
Type / to open the command palette for quick access to tools, agents, contexts, and interaction elements.
-
Type
/anywhere in the editor -
Use arrow keys to navigate options
-
Press
Enterto select orEscapeto close
Agent Formatting
Bold
Cmd/Ctrl + B: Toggles bold formatting on selected text or at the current cursor position.
Strikethrough
Cmd/Ctrl + Shift + S: Toggles strikethrough formatting on selected text or at the current cursor position
Headings
Type hashtags at the beginning of a new line:
-
#+Space= Heading 1 -
##+Space= Heading 2 -
###+Space= Heading 3 -
(continues up to
######for Heading 6)
Bullet Lists
Type at the beginning of a new line:
-
*+Space -
-+Space -
++Space
Or use keyboard shortcut: Cmd/Ctrl + Shift + 8
Ordered Lists
Type at the beginning of a new line:
-
1.+ space (or any number)
Or use keyboard shortcut:Cmd/Ctrl + Shift + 7
Horizontal Rule
Type at the beginning of a new line:
-
---(three dashes) -
___(three underscores + space)
Agent Workflow
The Agent Workflow, displayed on the right side of the screen, provides a visual representation of the process described in the Agent Behaviour. It shows decisions, Tools, and other elements you’ve defined. Use this visualisation to confirm that the Agent Behaviour aligns with your intended workflow.
The Agent Workflow is purely visual and does not influence HALO’s decision-making. The textual Agent Behaviour you’ve written is the primary guide for the Agent’s actions.