The Product Feed app delivers the most up-to-date information about your products, enabling you to effectively incorporate this data into your emails. You can utilize this app within your email campaigns to include the latest product information through two methods:
-
Using Item IDs: An item ID is a unique identifier for a product. By providing an item ID, your email campaigns can retrieve the latest product data from the Product Feed, enriching the emails with accurate product information. More information can be found in this article.
-
Using Segments: This method involves incorporating product data based on predefined segments in the Product Feed app, allowing for tailored product recommendations and personalized email content.
In this article, we'll guide you on how to incorporate Product Feed data into your email campaigns using Product Feed segments.
Tip: Use the Product Carousel
You can now create product carousels using the built-in block within our email editor. Drag the "Products" block into your email editor and follow the guided setup. See this article for more information. The manual method described in this article is available for advanced use cases requiring custom configuration.
Step 1 - Select a Product Feed Segment
First, you need to create a segment in the Product Feed app or select an existing one. To find the name of the segment, open the segment and click on "View details" located under the save button. For this example, we'll use "mens-bestsellers."

Step 2 - Add Merge Tags to Your Email
During the beta phase, merge tags need to be added manually to your email campaign. A merge tag starts with “Product“, followed by the segment name, index, and column name.
Here’s how you construct your merge tags:
-
Segment name: The name of the segment selected in step 1.
-
Index: The position of the product in the segment (top-down), starting from 1.
-
Column name: The name of the column in the Product Feed, as shown in brackets in the Product Feed app.
The format and an example for the "mens-bestsellers" segment can be found below:
Format: {{ Product.SegmentName.Index.ColumnName }}
Example: {{ Product.mens-bestsellers.1.name }}

Step 3 - Add Conditional Rows to Your Email
A new default merge tag has been introduced, which represents the number of products in your segment. This feature allows you to dynamically display a certain number of rows with products, ensuring that only the rows that can be filled with product data are shown in the email.
Format: {{ Product.SegmentName.Count }}
Example: {{ Product.mens-bestsellers.Count }}
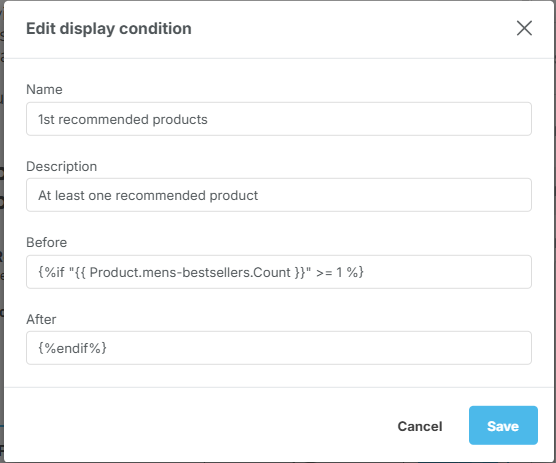
To implement this, create a row for each product and add a condition to ensure that the row is displayed only when there is product data available. Since only strings were previously allowed, you’ll need to add a custom condition. Below is an example for the first row, and you can increase the number in the condition as you add more rows. This indicates that the array should contain at least one product for the row to be shown.
Before: {%if "{{ Product.mens-bestsellers.Count }}" >= 1 %}
After: {%endif%}
More information on how to add conditional rows to your email can be found in this article.
Step 4 - Send a Test Email
Now that you've added the segment, merge tags, and conditions, it's essential to test your setup. You can easily send yourself a test email by clicking on the three dots in the email editor. Make sure that the segment you’ve added contains products. This will allow you to verify that the email correctly pulls in and displays product data.
By performing these tests, you can confirm that your email campaign is correctly configured to show the desired product information dynamically.