
Add Cash Register
This guide will walk you through the process of configuring your cash register settings in your Point of Sale (POS) system. After clicking the "Add cash register" button, you will be presented with a series of modals to customize your cash register. Below is a detailed explanation of each section and its options.
1. General Settings
The General tab allows you to set the basic details and security preferences for your cash register.
Options:
Name: Enter a unique name for your cash register. This is a required field.
Screen Lock Time: Choose how long the system should wait before locking the screen due to inactivity. Options include:
30 seconds
1 minute
5 minutes (default)
15 minutes
Never
Shift Registration: Enable this option if you want to track shifts for employees using the cash register.

2. Payments
The Payments tab lets you configure the payment methods and invoicing options available on the cash register.
Options:
Payment Methods: Select the payment methods you want to enable. Options include:
Cash (enabled by default)
Terminal
iZettle
SoftPOS
Sunmi
Standalone Terminal
Additional Options:
Split Payment: Enable this option to allow customers to pay using multiple payment methods.
Invoicing:
Enable the Invoice option to allow the creation of invoices.
Optionally, enable adding companies on Cash Register to associate invoices with specific companies.

3. User Interface
The User Interface tab allows you to customize the features and notifications visible on the cash register interface.
Options:
Additional Options: Toggle the following features on or off:
Scan: Enable scanning functionality. (enabled by default)
Tip: Allow customers to add tips. (enabled by default)
Hospitality: Enable hospitality-related features.
Discount: Allow discounts to be applied.
Own Use: Track items used internally by the business.
Voucher: Enable voucher payments.
Loss: Track inventory losses.
Allow Refunds: Enable refund functionality. (enabled by default)
Cash Drawer: Enable cash drawer management.
Favorite: Choose a favorite feature to display prominently in the footer on smaller screens.
Notifications:
Low on Stock: Notify when stock levels are low.
Critical on Stock: Notify when stock levels are critically low (enabled by default).
Extra Information Fields: Add custom form fields to collect additional information during transactions.

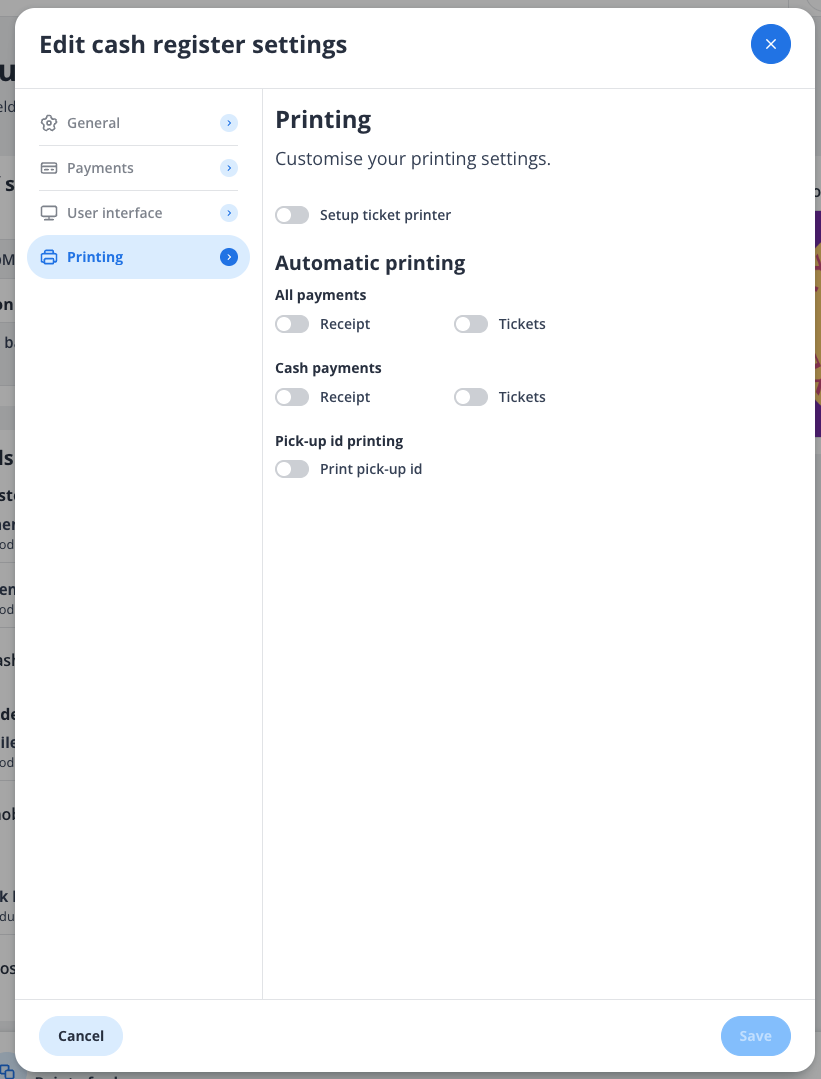
4. Printing
The Printing tab allows you to configure printing settings for receipts, tickets, and pick-up IDs.
Options:
Setup Ticket Printer: Enable this option to configure a ticket printer.
Automatic Printing:
All Payments:
Receipt: Automatically print receipts for all payments.
Tickets: Automatically print tickets for all payments.
Cash Payments:
Receipt: Automatically print receipts for cash payments.
Tickets: Automatically print tickets for cash payments.
Pick-up ID Printing:
Enable Print pick-up ID to automatically print pick-up IDs for orders. Usefull in combination with the Pickup Display
Saving Your Settings
Once you have configured all the desired settings, click the Save button in the bottom-right corner of the modal to apply your changes. If you wish to discard your changes, click Cancel.
Notes:
You can revisit and edit these settings at any time by navigating to the cash register settings in your POS system.
Ensure that the selected options align with your business needs to optimize the functionality of your cash register.
If you have further questions or need assistance, please contact our support team.