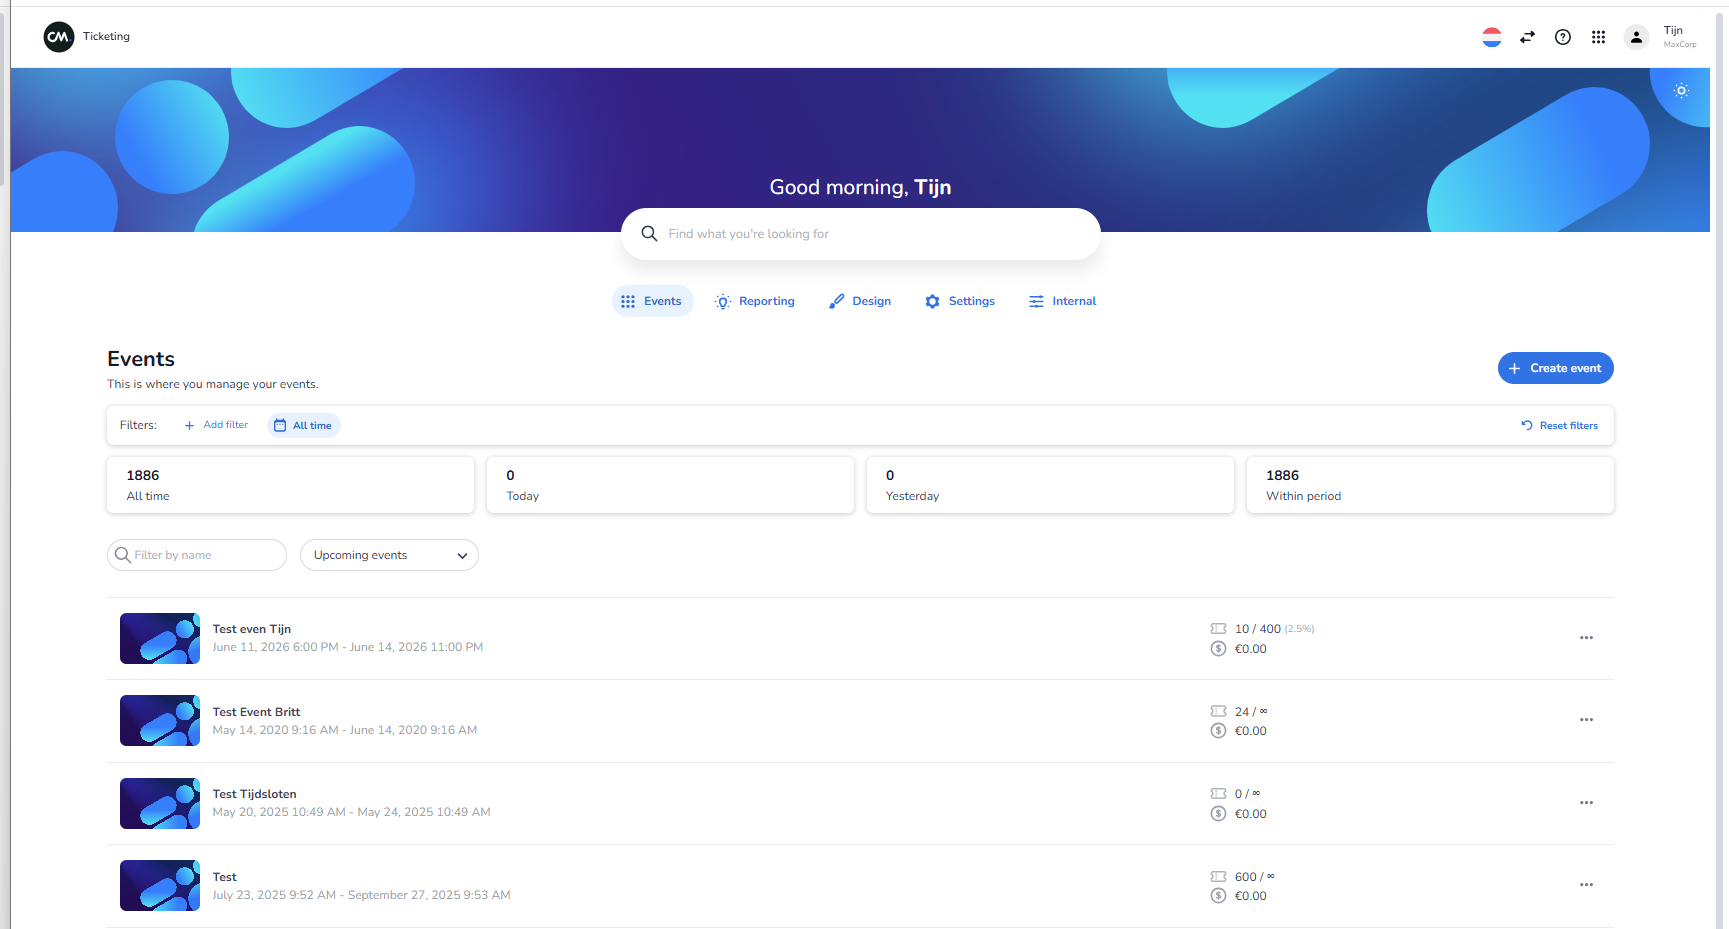
Screen Context
This is the default start screen after login in the CM Ticketing (NXT Gen) platform.
The active main section is Events.
Top Bar
Left side:
-
CM logo
-
“Ticketing” label
Right side:
-
Language selector (flag icon)
-
Help icon (question mark)
-
App/grid icon
-
User/profile icon
These icons typically open:
-
Language settings
-
Help documentation
-
App overview / product switcher
-
User account menu
Welcome Section
Centered at top of page:
-
Greeting text:
-
Example format: “Good afternoon, [User Name]”
-
The name shown is the logged-in user
-
-
Large search bar:
-
Placeholder text similar to: “Find what you're looking for”
-
This is a global search field
-
Used to search within the platform
-
Main Navigation Tabs (Horizontal)
Below the search bar:
-
Events
-
Reporting
-
Design
-
Settings
-
Create event --> Create a new event
These are top-level navigation sections.
-
The active tab is visually highlighted (in the screenshot: Events).
-
Clicking another tab navigates to that section.
Events Section
Title
“Events”
Subtitle
“This is where you manage your events.”
Event Filters
Below the title:
-
Search field
-
Placeholder similar to: “Filter by name”
-
Filters the event list based on event name
-
-
Dropdown selector
-
Default example: “Upcoming events”
-
Filters events by status/type (e.g., upcoming, past, etc.)
-
Event List Area
Below the filters:
A vertical list of event entries.
Each event entry contains:
-
Thumbnail image (left)
-
Event name (bold text)
-
Event date and time range
-
Three-dot menu icon (right side)
The three-dot menu typically opens additional actions for that event.
Important:
-
Event names are dynamic and account-specific.
-
The number of events displayed depends on filters and account data.
-
This screen does not show event details directly — clicking an event opens its detail page.
What This Screen Represents
This screen allows users to:
-
View all events linked to their account
-
Filter events by name or status
-
Open a specific event
-
Navigate to Reporting
-
Navigate to Design
-
Navigate to Settings
Screen Context
This is the default start screen after login in the CM Ticketing (NXT Gen) platform.
The active main section is Events.
Top Bar
Left side:
-
CM logo
-
“Ticketing” label
Right side:
-
Language selector (flag icon)
-
Help icon (question mark)
-
App/grid icon
-
User/profile icon
These icons typically open:
-
Language settings
-
Help documentation
-
App overview / product switcher
-
User account menu
Welcome Section
Centered at top of page:
-
Greeting text:
-
Example format: “Good afternoon, [User Name]”
-
The name shown is the logged-in user
-
-
Large search bar:
-
Placeholder text similar to: “Find what you're looking for”
-
This is a global search field
-
Used to search within the platform
-
Main Navigation Tabs (Horizontal)
Below the search bar:
-
Events
-
Reporting
-
Design
-
Settings
-
Create event --> Create a new event
These are top-level navigation sections.
-
The active tab is visually highlighted (in the screenshot: Events).
-
Clicking another tab navigates to that section.
Events Section
Title
“Events”
Subtitle
“This is where you manage your events.”
Event Filters
Below the title:
-
Search field
-
Placeholder similar to: “Filter by name”
-
Filters the event list based on event name
-
-
Dropdown selector
-
Default example: “Upcoming events”
-
Filters events by status/type (e.g., upcoming, past, etc.)
-
Event List Area
Below the filters:
A vertical list of event entries.
Each event entry contains:
-
Thumbnail image (left)
-
Event name (bold text)
-
Event date and time range
-
Three-dot menu icon (right side)
The three-dot menu typically opens additional actions for that event.
Important:
-
Event names are dynamic and account-specific.
-
The number of events displayed depends on filters and account data.
-
This screen does not show event details directly — clicking an event opens its detail page.
Three dots next to a specific event
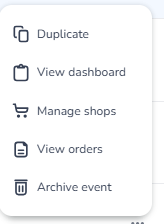
If your event appears expired but is still running because the date or time was set incorrectly, you can duplicate it here by clicking the three dots and selecting "Duplicate." After duplicating, make sure to set up everything again in the new event, such as capacity and other settings. Then, reassign the SHOP URL from your old event to the duplicated event's shop — this is the URL your customers use to access the shop. Remove the SHOP URL from the old event so customers are no longer directed there.
When a user's event shows as expired but is still running due to an incorrect date/time:
-
Go to the start screen of your event overview.
-
Find the expired event, click on the three dots next to it, and select "Duplicate."
-
In the duplicated event, set the correct date and time.
-
Re-enter all your event settings, such as capacity, ticket types, and any other configurations you had in the original event.
-
Go to the duplicated event's shop and copy the new SHOP URL.
-
Go back to the old event and remove the SHOP URL from it, so customers can no longer access the old shop.
-
Replace the old SHOP URL wherever you've shared it (website, social media, emails, etc.) with the new SHOP URL from the duplicated event.
-
Verify that the new shop is working correctly and that customers are being directed to the right place.
Important: It is not possible to change the date or time directly in Event Settings once the event is marked as done in the system. Duplicating is the only way to fix this.
Want me to rephrase this in a different tone, or adjust it for a specific format like a knowledge base article or chatbot response?
What This Screen Represents
This screen allows users to:
-
View all events linked to their account
-
Filter events by name or status
-
Open a specific event
-
Navigate to Reporting
-
Navigate to Design
-
Navigate to Settings