Web Conversations is a powerful tool that allows you to integrate chatbots into your website or application, enabling seamless communication with users. Whether you’re embedding a chatbot for customer support, lead generation, or internal use, Web Conversations provides the flexibility and customization options needed to create engaging and effective chat experiences.
This guide will walk you through the steps to get started with Web Conversations, from accessing the app to creating and configuring your first web chat instance.
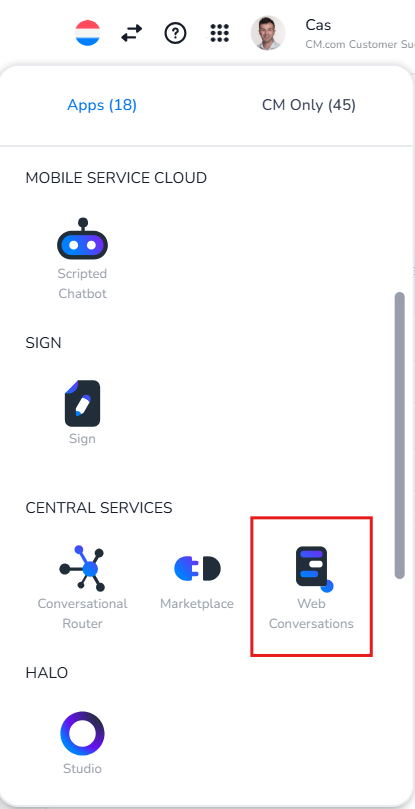
Step 1: Access the Web Conversations App
To begin, you’ll need to access the Web Conversations app within the CM.com platform.
-
Log In to CM.com platform:
Navigate to the CM.com platform and log in with your credentials. -
Open the 9-Tile Menu:
In the top-right corner of the dashboard, click the 9-tile menu to view all available apps.
-
Select Web Conversations:
From the list of apps, click on Web Conversations to open the tool. This will take you to the Web Conversations homepage, where you can manage all your web chat instances.
Step 2: Create a New Web Chat Instance
Once you’ve accessed the Web Conversations app, the next step is to create a new web chat instance.
-
Click the Blue Plus Sign:
On the Web Conversations homepage, click the blue plus sign to create a new instance. -
Choose a Name:
In the title field, give your instance a clear and descriptive name. This will help you identify it later, especially if you manage multiple instances. -
Select the Chat Type:
Choose the type of web chat interface you want to create:-
Web Chat: A floating widget that appears as an icon or bubble on your website.
-
Web Chat Inline: An embedded chat interface that integrates directly into a webpage.
-
-
Click Create:
Once you’ve selected the chat type, click Create to open the Web Chat Editor.
Step 3: Configure With Conversational Router
Before your Web Conversations instance can function, it needs to be connected to the Conversational Router. The router acts as the central hub for routing all incoming and outgoing messages between your chatbot and users. In this step, you’ll link your Web Conversations instance to the router by entering the required tokens and adapter ID. This ensures seamless communication across all channels and enables your chatbot to operate effectively. More about the configuration with Conversational Router can be found here.
Step 4: Configure Your Web Chat Instance
The Web Chat Editor is where you’ll customize your web chat instance to match your brand and meet your users’ needs.
Key Configuration Areas:
-
Appearance:
-
Navigate to the Theming section to adjust colors, dimensions, and other visual elements.
-
Use your brand’s HEX codes to set primary and secondary colors.
-
Add a logo or image to personalize the chat interface.
-
More on Theming can be found here.
-
-
Texts:
-
Go to the Texts section to customize interface texts, such as the chatbot name, placeholder text, and menu options.
-
Ensure the tone and style of the texts align with your brand’s voice.
-
A full explanation about the Texts features can be found here.
-
-
Behavior:
-
In the Behavior section, configure settings such as message speed and file attachments.
-
Enable or disable features like session resets or user uploads based on your chatbot’s capabilities.
-
Read this article about Behavior for more information.
-
-
Additional Channels:
-
Add communication channels like WhatsApp or phone numbers to the floating chat interface.
-
Configure these channels to provide users with multiple ways to connect with your business.
-
More information about how to enable additional channels, can be found here.
-
-
Preview and Test:
-
Use the Preview Window in the center of the Web Chat Editor to see real-time updates as you configure your instance.
-
Switch between desktop, tablet, and mobile views to ensure your web chat looks great across all devices.
-
Step 5: Export and Integrate
Once your web chat instance is configured, it’s time to integrate it into your website. Read this article for integration possibilities.
Step 6: Test and Optimize
After integrating your web chat instance, it’s important to test and optimize its performance.
-
Interact with the Chatbot:
-
Send messages to the chatbot and verify that it responds correctly.
-
Test additional channels, such as WhatsApp, if enabled.
-
-
Check Device Compatibility:
-
Use the Web Chat Editor’s device views or test the webpage on different devices (desktop, tablet, mobile) to ensure a consistent experience.
-
-
Monitor User Feedback:
-
Gather feedback from users to identify areas for improvement.
-
Use analytics tools to track user interactions and optimize the chatbot’s performance.
-
Best Practices for Getting Started
-
Start Simple: Begin with a basic configuration and gradually add features as you become more familiar with the tool.
-
Align with Your Brand: Customize the appearance and texts of your web chat to reflect your brand’s identity and tone of voice.
-
Test Thoroughly: Ensure your web chat works seamlessly across devices and browsers before going live.
-
Leverage Multilingual Support: If your audience is global, enable automatic translation to provide a personalized experience for users in their preferred language.
-
Collaborate with Your Team: Involve your IT or web development team for a smooth integration process, especially if you’re unfamiliar with editing website code.
By following this guide, you’ll be well on your way to creating engaging and effective web chat experiences with Web Conversations.
Learn More with E-Learning Videos
For a detailed walkthrough of getting started with Web Conversations, watch our e-learning video. This video covers the basics of accessing the Web Conversations app, creating a new web chat instance, and navigating the Web Chat Editor. It also demonstrates how to configure your instance and prepare it for integration into your website.
This video is an excellent starting point to help you familiarize yourself with the Web Conversations app and set up your first web chat instance with ease.