Tracking is commonly used by event organizers to measure marketing performance, analyse visitor behaviour, and attribute ticket sales to marketing campaigns.
This article explains:
-
how tracking works in the ticket shop
-
how to configure tracking presets
-
which tracking platforms are supported
-
how tracking events are triggered during the ticket purchase flow
-
differences between tracking architectures such as client-side and server-side tracking
What tracking is used for
When a visitor interacts with the ticket shop, events are generated and sent to analytics platforms.
Examples of tracked actions include: page view, product view, start checkout, and ticket purchase. These events allow marketing platforms to measure the ticket purchase funnel.
Example flow
-
A visitor opens the ticket shop
-
The visitor performs an action (view ticket, select ticket, start checkout)
-
A tracking event is triggered
-
The event is sent to an analytics platform
-
The platform records the event and attributes conversions to campaigns
How tracking works in the ticket shop
When a visitor interacts with the ticket shop, events are generated and sent to analytics platforms.
Examples of tracked actions include:
-
page view
-
product view
-
start checkout
-
ticket purchase
These events allow marketing platforms to measure the ticket purchase funnel.
Example flow
4
Simplified flow:
-
A visitor opens the ticket shop
-
The visitor performs an action (view ticket, select ticket, start checkout)
-
A tracking event is triggered
-
The event is sent to an analytics platform
-
The platform records the event and attributes conversions to campaigns
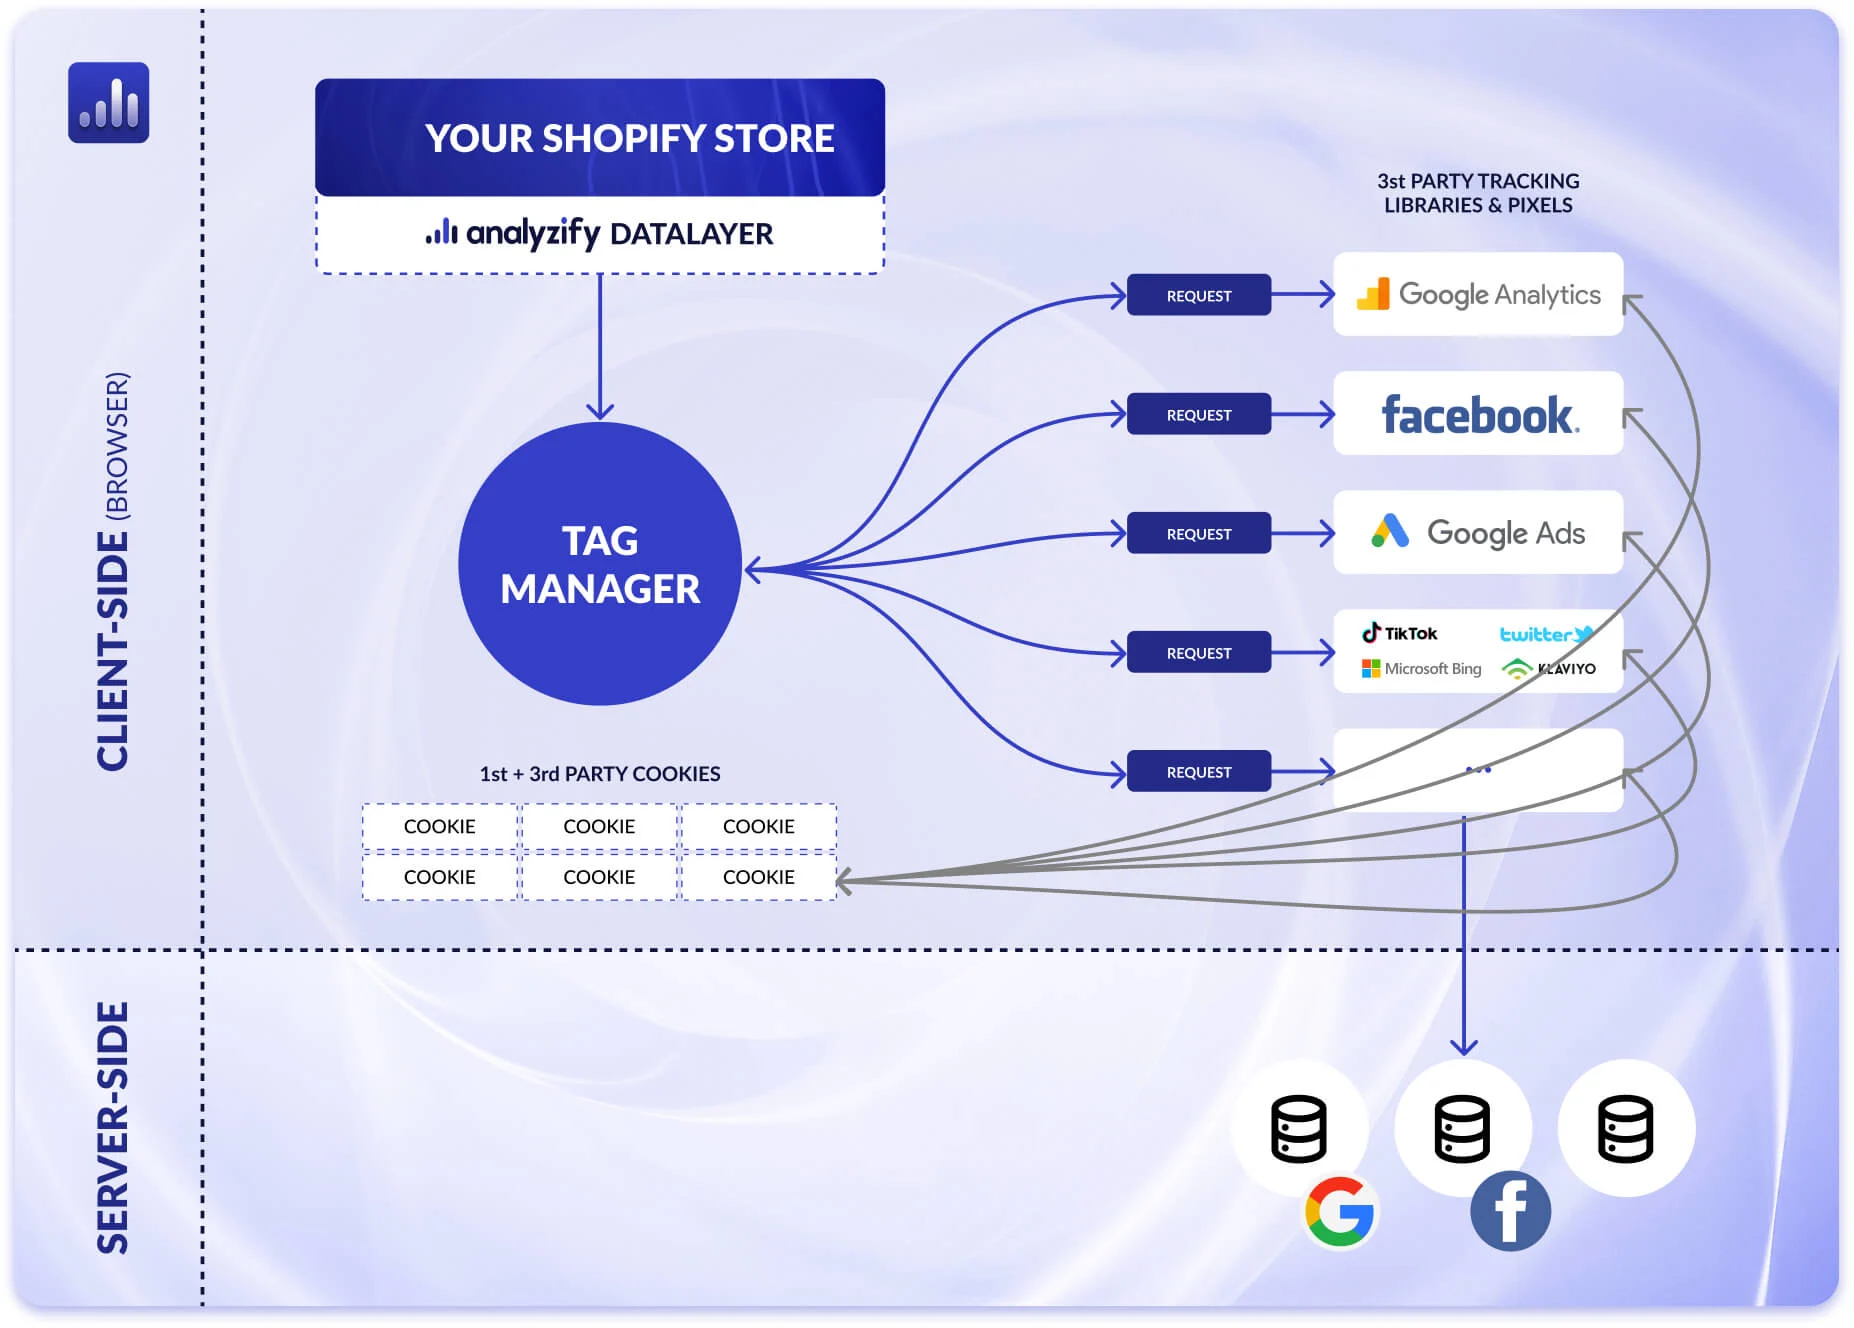
Client-side vs Server-side tracking
Client-side tracking
Server-side tracking happens on the backend of the ticketing platform. Instead of the browser sending the event, the platform backend sends event data directly to the analytics platform after an action occurs.
Examples: Meta Conversions API, server-side Google Tag Manager, backend event forwarding.
Characteristics:
-
events sent from backend servers
-
more reliable conversion tracking
-
less affected by ad blockers
-
more complex setup
Server-side tracking
Server-side tracking happens on the backend of the ticketing platform.
Instead of the browser sending the event, the platform backend sends event data directly to the analytics platform after an action occurs.
Examples:
-
Meta Conversions API
-
server-side Google Tag Manager
-
backend event forwarding
Characteristics:
-
events sent from backend servers
-
more reliable conversion tracking
-
less affected by ad blockers
-
more complex setup
Tracking presets in the ticketing platform
The ticketing platform supports tracking through Google Tag Manager (GTM) using predefined tracking presets. These presets provide a preconfigured GTM container that already contains commonly used tracking tags.
Two preset containers are available:
|
Preset |
Platforms included |
|---|---|
|
Basic preset |
Google Analytics (GA4), Google Ads |
|
Advanced preset |
Facebook Pixel, TikTok Pixel, Snapchat Pixel |
These presets allow users to quickly implement tracking without building a full GTM setup manually.
Step-by-step setup of tracking presets
The setup process is documented in the Knowledge Center article.
Requirements
Before starting the setup, the following is required:
-
a Google Tag Manager account
-
a Google Analytics account
-
a GTM container ID connected to the ticket shop
The GTM container ID must be configured in the ticketing platform so the tracking scripts load in the ticket shop.
Setup process
1. Log in to Google Tag Manager
Open Google Tag Manager and log in.
2. Download the preset container
Download the preset container file:
-
basic-gtm-cm-com.json
-
advanced-gtm-cm-com.json
3. Open the Admin section
Navigate to the Admin section in Google Tag Manager.
4. Select the account and workspace
Choose the account and workspace where the container should be imported.
5. Import the container
Select Import Container.
6. Upload the preset file
Upload the JSON container file.
7. Select workspace
Create a new workspace or select an existing workspace.
8. Choose overwrite option
Select Overwrite so the preset configuration is applied correctly.
9. Confirm the import
Confirm the import to apply the configuration.
After importing the container, the preset tags and triggers are available in the GTM container and can be configured with the correct tracking IDs.