This guide will walk you through the process of adding and configuring a kiosk in your point-of-sale (POS) system. A kiosk is a self-service terminal that allows customers to interact with your business, such as placing orders or purchasing tickets. Follow the steps below to set up a kiosk and customize its settings.
Steps to Add a Kiosk
-
Access the Kiosk Settings
-
Navigate to the kiosk management section in your POS system.
-
Click the "Add Kiosk" button to open the kiosk configuration window.
-
-
Configure the Kiosk Settings
After clicking "Add Kiosk," you will see the Kiosk Settings screen. This screen allows you to customize the kiosk's functionality. Below is a breakdown of the available options:
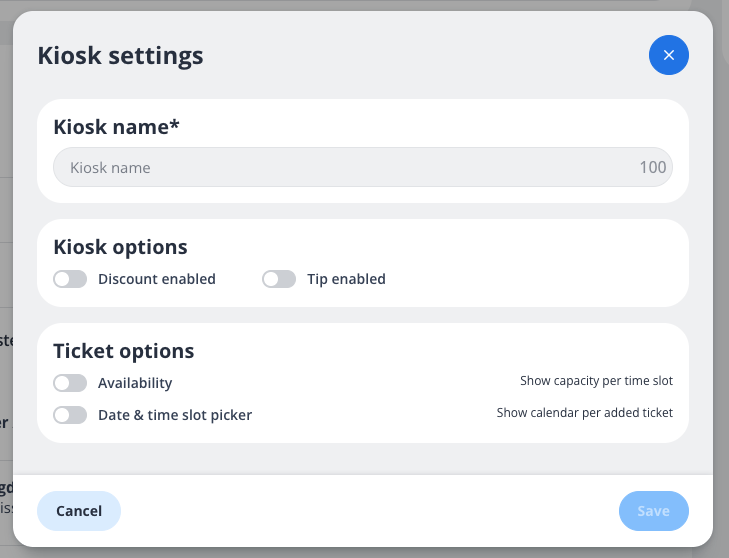
Kiosk Settings Breakdown
1. Kiosk Name
-
Field:
Kiosk name* -
Description: Enter a unique name for the kiosk. This name will help you identify the kiosk in your system.
-
Character Limit: 100 characters.
-
Required: Yes (indicated by the asterisk
*).
2. Kiosk Options
-
Discount Enabled: Toggle this option ON if you want the kiosk to allow discounts on transactions.
-
Tip Enabled: Toggle this option ON if you want the kiosk to allow customers to add tips during checkout.
3. Ticket Options
-
Availability: Toggle this option ON to display the capacity per time slot for ticketed events or services.
-
Date & Time Slot Picker: Toggle this option ON to enable a calendar view, allowing customers to select specific dates and time slots for their tickets.
Actions
-
Cancel: Click this button to discard any changes and close the kiosk settings window.
-
Save: Once you have configured the settings, click this button to save the kiosk and apply the changes.
Notes
-
You can always edit the kiosk settings later if needed.
-
Ensure that the kiosk name is descriptive enough to differentiate it from other kiosks in your system.
By following these steps, you can successfully add and configure a kiosk in your POS system. If you encounter any issues, please contact support for assistance.