Introduction
This guide explains how to show IVR menu choices directly in ‘Mobile Service Cloud' (MSC) by combining routing keywords in ‘Voice Flow Builder’ with tags and advanced triggers in ‘Agent Inbox’.
By doing this, agents no longer have to start every call with “How can I help you?” when the customer has already made a selection in the IVR. Instead, they immediately see the customer’s chosen topic, and you can automatically route specific topics to dedicated specialists or teams.
Overview
When a customer calls your main number, they are often presented with an IVR menu with several options (for example: “Order status”, “New order”, “Damage”). One or more of these options will transfer the call to agents in ‘Mobile Service Cloud’.
You will configure the system so that:
-
Each IVR path that transfers to MSC is given a routing keyword in ‘Voice Flow Builder’.
-
‘Agent Inbox’ uses advanced triggers to:
-
Add a clear tag to the conversation (e.g. “IVR – Order status”).
-
Optionally assign certain topics to specific agents or teams.
-
This also works when multiple IVR flows end in the same webstore. Agents can then see both:
-
Which number or webstore referrer was called.
-
Which IVR choice the customer made.
Prerequisites
Before you begin, make sure you have:
-
Access to the ‘CM.com platform’.
-
Permissions to edit flows in the ‘Voice Flow Builder’ app.
-
Permissions to configure tags and triggers in ‘Agent Inbox’.
-
At least one IVR flow that uses ‘Transfer to MSC’ blocks to send calls to MSC.
1. Configure Routing Keywords in Voice Flow Builder
In this step, you add a unique routing keyword to each IVR route that transfers calls to MSC.
-
Log in to the ‘CM.com platform’.
-
Open the ‘Voice Flow Builder’ app from the nine‑tile menu.
-
Open the call flow that contains your IVR:
-
Click the three dots next to the relevant flow.
-
Select ‘Open Editor’ to open the flow editor.
-
-
In the flow, locate the part of your IVR where the caller has already made a choice and the call is handed over to MSC.
-
Typically, you will see a ‘Transfer to MSC’ block at the end of each IVR path.
-
-
For each IVR path that should send calls to MSC:
-
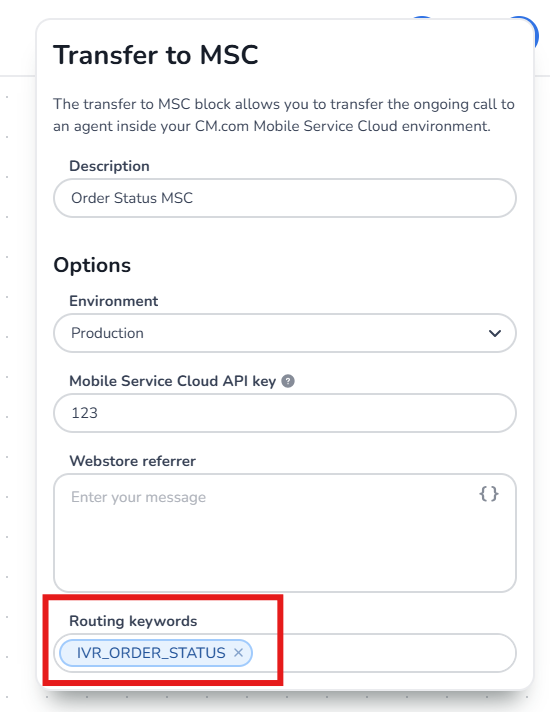
Click the relevant ‘Transfer to MSC’ block.
-
In the block settings, find the ‘Routing keywords’ field.
-
Enter a short, unique code that describes this route, for example:
-
IVR_TOPIC_1 -
IVR_TOPIC_2 -
IVR_TOPIC_DAMAGE
Use a consistent naming pattern so you can easily manage them later.
-
-
Save the block.
-
-
Repeat this for every IVR path that transfers calls to MSC.
-
When all routing keywords are in place, click Publish to activate the updated flow.
Result:
Each call that passes through these IVR routes now carries an internal routing keyword indicating which path the caller followed.
2. Create Matching Tags in Agent Inbox
Next, you create tags in ‘Agent Inbox’ that correspond to your IVR topics. These tags will be visible to agents on incoming conversations.
-
Open ‘Agent Inbox’.
-
Click the three dots in the bottom‑left corner to open Settings.
-
Go to ‘Conversation tools’.
-
Open the Tags section.
-
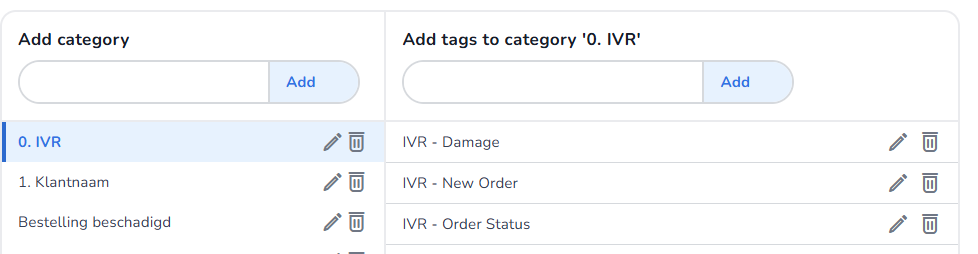
Create a tag for each IVR topic you want to surface to agents. For example:
-
IVR – Topic 1 -
IVR – Topic 2 -
IVR – Damage
Use clear, agent‑friendly wording so agents immediately understand the context.
-
-
Click Save.
Result:
These tags are now available to be added automatically via triggers.
3. Configure Advanced Triggers for Each Routing Keyword
Now you connect the routing keywords from Voice to the tags in MSC using Advanced triggers.
3.1 Open Advanced Triggers
-
In ‘Agent Inbox’, go to Settings.
-
Navigate to Triggers.
-
Select ‘Advanced triggers’.
3.2 Create a Trigger to Add a Tag Based on a Routing Keyword
For each routing keyword, create a corresponding trigger:
-
Create a new advanced trigger.
-
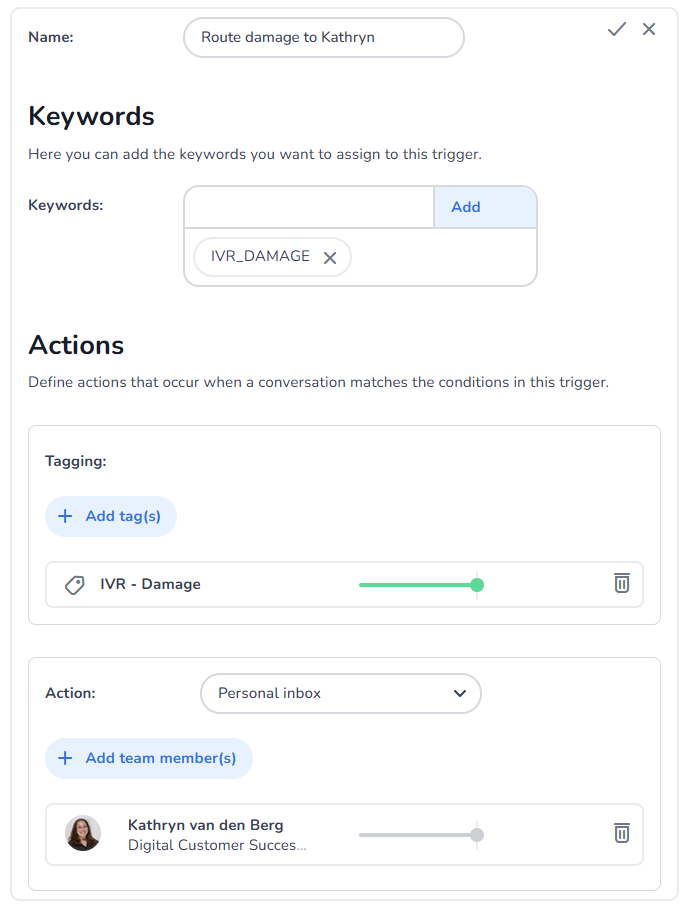
Give it a descriptive name, such as:
-
Add tag – IVR Topic 1
-
-
Under Keywords, add the routing keyword.
-
Under Actions, add the tag:
-
Save the trigger.
Repeat this pattern for each IVR route that should result in a tag.
3.3 (Optional) Route Specific Topics to a Specialist or Team
For some IVR topics, you may want to automatically route calls to a specific agent or team (for example, damage claims or high‑priority topics).
-
Open the advanced trigger for that routing keyword.
-
Under Actions, add:
-
Action: Add team member(s)
-
Value: choose the appropriate agents (e.g. your damage specialists).
-
-
-
Save the trigger.
Result:
Whenever a conversation arrives with this routing keyword, it is automatically tagged and assigned to the right responsible person or team.
4. Agent Experience in Mobile Service Cloud
After configuration:
-
A customer calls, navigates the IVR, and selects a menu option.
-
The call passes through the relevant ‘Transfer to MSC’ block, which applies the configured routing keyword.
-
When the conversation is created in ‘Mobile Service Cloud’:
-
Advanced triggers evaluate the routing keyword.
-
The appropriate IVR tag is added to the conversation.
-
Optional routing actions (such as assignment to a specialist) are applied.
-
When the agent accepts the call and the conversation finishes loading, they see a tag indicating the chosen IVR topic, and—if configured—the conversation will already be assigned to the correct specialist.
5. Testing and Troubleshooting
To validate your setup and avoid surprises in production:
-
Test each IVR route
-
Call your number and try each menu option that should transfer to MSC.
-
Confirm:
-
The call reaches ‘Mobile Service Cloud’.
-
The correct IVR tag appears.
-
Any special routing (e.g. to a dedicated agent) is applied.
-
-
-
Check routing keywords
-
In ‘Voice Flow Builder’, ensure each ‘Transfer to MSC’ block has:
-
A routing keyword defined.
-
No typos (values must exactly match what your triggers use).
-
-
-
Check triggers
-
In ‘Agent Inbox’ → Advanced triggers’:
-
Verify conditions use the correct routing keyword.
-
Verify actions refer to the correct tag and agent/team.
-
-
-
Multiple flows, one webstore
-
If several IVR flows end in the same webstore:
-
Use webstore referrer to see which number was called.
-
Use IVR tags to see which menu choice was made.
-
Together, this gives agents both “where the call came from” and “why the customer is calling”.
-
-
-
Unexpected flow changes
-
If IVR texts or options appear changed (for example, an option temporarily removed and then re‑added):
-
Ensure only authorized users can edit flows.
-
Use versions/history (if available) to restore the intended configuration.
-
Re‑publish the flow after changes.
-
-
6. Video
For a visual walkthrough of this configuration in ‘Voice Flow Builder’ and ‘Agent Inbox’, please watch the video below:
Conclusion
You have configured an integration where:
-
Each IVR route that transfers to MSC is labeled with a routing keyword in ‘Voice Flow Builder’.
-
‘Agent Inbox’ uses advanced triggers to:
-
Add clear IVR tags to conversations.
-
Optionally route specific topics to dedicated agents or teams.
-
This turns IVR choices into visible, actionable context for your agents and helps ensure that sensitive or complex calls are handled by the right people from the start.