Creating your first SMS campaign can be a straightforward and effective way to engage your audience through the Campaigns app. This guide will walk you through each step of the process, ensuring you have the necessary tools and knowledge to launch a successful SMS campaign.
Start a New Campaign
Navigate to the Campaigns app via the nine-tile menu and click “Create new“.

Decide if you want to create regular or triggered campaign, and select a template if needed. More information on the difference between a regular and triggered campaign can be found here.
Step 1 - Campaign
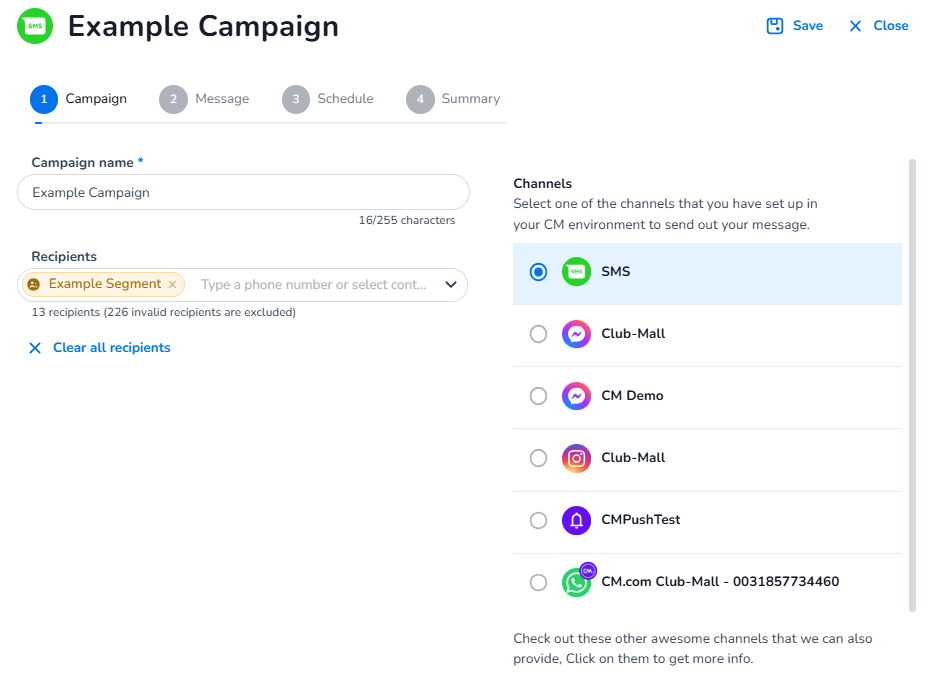
In the first step of the Campaign flow, begin by filling in essential details: the campaign name, channel selection, and recipient list (if creating a regular campaign).
-
Campaign Name: Provide a meaningful name, this name will not be visible to recipients.
-
Channel: Choose your desired channel from the list on the right. All channels activated in your account and supported by Campaigns will be displayed. For this example, select SMS.
-
Recipients: Specify who will receive the campaign. You can enter individual phone numbers, remembering to include the country codes for small groups, or select an Address Book group or CDP segment.
Step 2 - Message
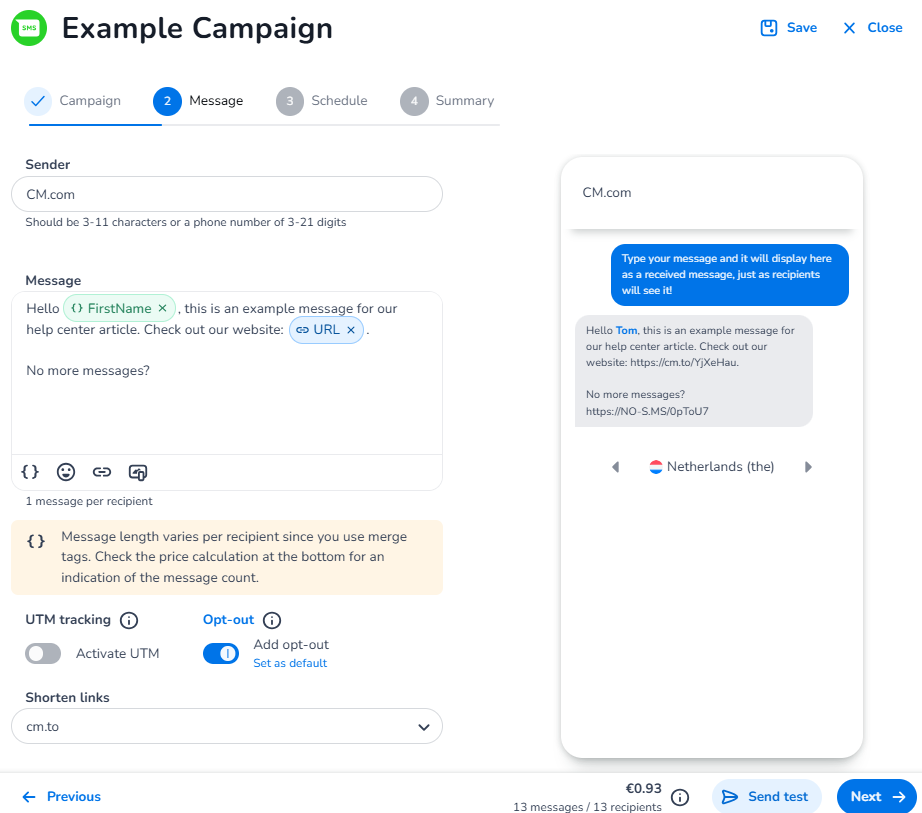
In the second step, configure the message itself by adding a sender name and crafting the message. Optionally, you can enhance it with a Page, shortened URL, and opt-out link:
-
Sender: Set the sender name, ensuring it is between 3 to 11 characters or a phone number of 3-21 digits. Note that the sender may differ accross different countries due to local regulation. More information can be found in this article.
-
Message: Write the content of your message and use 'merge tags' for personalization, such as including recipients' first names.
-
Emoji’s: We offer the option to add emojis to your campaign. Please note that for SMS, this significantly decreases the available character count per message. More information can be found here.
-
Add a Page: Incorporate a link to a landing page with rich content via Pages. Click the Pages icon to select an existing page or create a new one.
-
Add a URL: Use the URL icon to insert a link. It will be shortened automatically, adding more space for your message. Alternatively, you can add the plain text URL if you do not wish to shorten it.
Want to use your own branded shortlinks? Check out our this article. -
Show opt-out link: Adding a opt-out link to your message will allow your recipients to opt-out of future communications. You can disable it if preferred, but note that local laws may require inclusion. Any unsubscribers will be listed in the "Unsubscribers" group in the Address Book.
-
Send test message: Ensure you test your campaign before proceeding. Click the button at the bottom of the screen to send a test message to yourself. Note that when using merge tags, random data from the selected list will be used for the test.
Step 3 - Schedule
In the third step, choose whether to schedule your campaign or send it immediately. If necessary, you also have the option to spread the campaign over a specified period.
Step 4 - Summary
In the fourth and final step before sending your campaign, take the opportunity to review all details thoroughly. Ensure everything is accurate before proceeding. At the bottom of the screen, you'll see an estimated cost for the campaign. Please note that this is only an estimation and may not reflect the exact price that will be invoiced.
If everything looks correct, click "Send" in the bottom right corner to dispatch your campaign.
Video
Below you find a video on how to send a complete SMS Campaign via Mobile Marketing Cloud.