Entrance management → Entrance plans → Click on entrance plan, or create → Add scan rule
In this page you see a description for every step of scan rules, from top to below.
For everything about Scanning options, specific tickets in an entrance plan use this document
1. Rule setup
Description
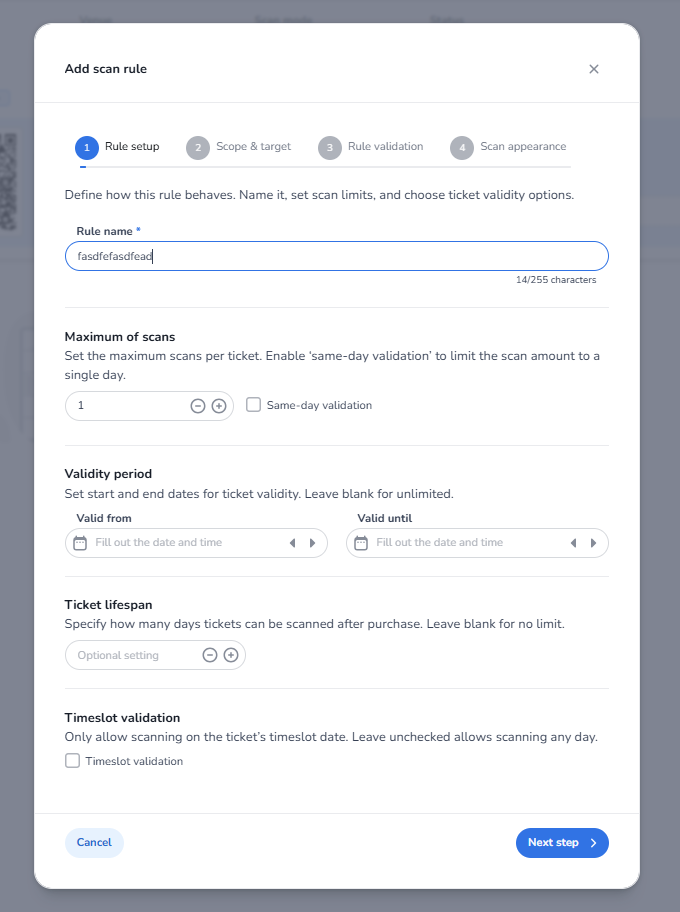
This screen appears when creating or editing a scan rule within an Entrance Plan in Entrance Management.
Scan rules define how tickets are validated when they are scanned at the entrance of an event. They control things like how many times a ticket can be scanned, when it is valid, and whether timeslot rules apply.
This step (Rule setup) is used to configure the basic validation behaviour for tickets within the entrance plan.
Main Fields and Functions
Rule name
Used to give the scan rule a recognizable name. This helps identify the rule when multiple scan rules are used within the same entrance plan.
Maximum of scans
Defines how many times a ticket can be scanned.
For most events this is set to 1, meaning a ticket can only be used once for entry.
Same-day validation
Limits multiple scans to the same day. This is useful when tickets allow re-entry but only during the same event day.
Validity period (Valid from / Valid until)
Defines the time window in which a ticket can be scanned.
If left empty, the ticket remains valid without a specific time restriction.
Ticket lifespan
Specifies how many days after purchase a ticket can still be scanned. If not set, the ticket does not expire based on purchase time.
Timeslot validation
Restricts scanning to the timeslot assigned to the ticket. If disabled, the ticket can be scanned regardless of its timeslot.
Navigation
Cancel
Closes the configuration without saving changes.
Next step
Moves to the next step of the scan rule setup, where the scope and targets of the rule can be configured.
2. Scope & Target
Description
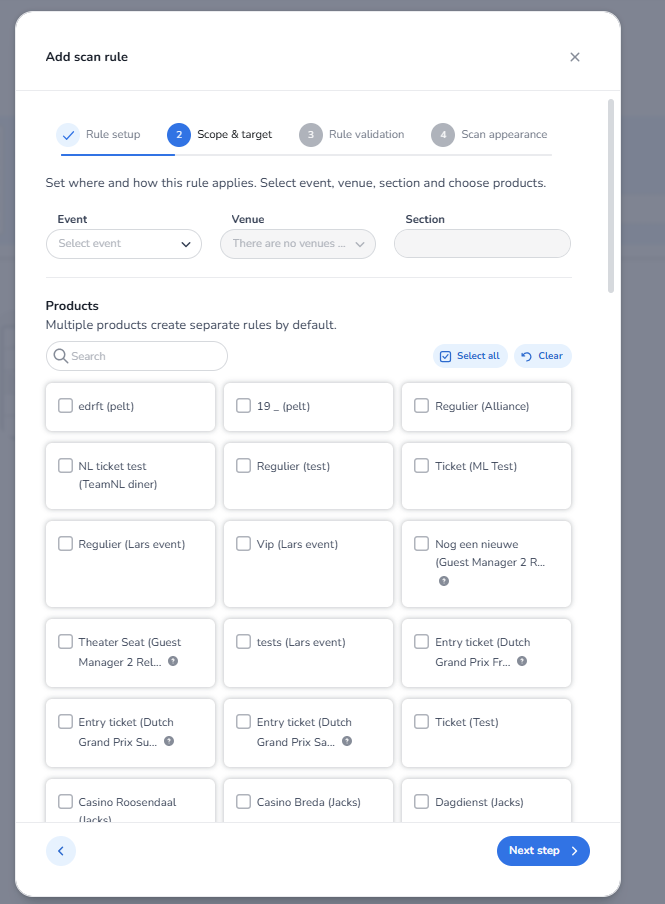
This screen appears in step 2 of creating a scan rule within an Entrance Plan in Entrance Management.
Here you define where the scan rule applies and which tickets or products can be scanned. This allows organizers to control exactly which tickets are valid for a specific entrance plan, event, or location.
This is useful when you want to restrict scanning to specific tickets, specific days, or specific areas of an event.
Main Fields and Functions
Event
Select the event for which this scan rule applies. This ensures that only tickets belonging to the selected event can be validated under this rule.
Venue
Select the venue where the scan rule should apply. This helps define where tickets can be scanned when multiple venues exist.
Section
Used to specify a particular section within the venue if needed. This can be used to separate scanning rules for different areas.
Products
Here you select the tickets or products that should be validated by this scan rule.
Products can include:
-
Entry tickets
-
VIP tickets
-
Guest list tickets
-
Other event-related products
You can select multiple products, and by default separate rules can be created for each selected product.
This is useful for situations such as:
-
Allowing only tickets for a specific day to be scanned
-
Separating VIP tickets from regular tickets
-
Controlling access for different ticket types or event areas
Search
Allows you to quickly search for specific tickets or products.
Select all
Selects all available products in the list.
Clear
Removes all selected products.
Navigation
Back arrow
Returns to the previous step (Rule setup).
Next step
Moves to the next step of the scan rule configuration (Rule validation).

3. Rule Validation
Description
This screen appears in step 3 of creating a scan rule within an Entrance Plan in Entrance Management.
This step is used to define how the scan validation should behave and where the validation applies. It determines whether scans are validated only within the current entrance plan or across a broader collection of plans.
Main Fields and Functions
Constraints
This section shows the available fields for primary, secondary, and tertiary constraints that can be applied to a scan rule. These fields are visible in the interface but are not selectable in this environment.
Validation scope
This setting determines where scan validation is checked.
If Validate scans on collection is enabled, the system will validate scans across the entire collection of entrance plans. This means a ticket scanned in one plan will also be recognized as scanned in other plans within the same collection.
If this option is disabled, the scan validation only applies within the current entrance plan.
This can be useful when multiple entrances or plans exist but you want to ensure that a ticket cannot be scanned multiple times across different entrances.
Navigation
Back arrow
Returns to the previous step (Scope & target).
Next step
Moves to the final step of the scan rule setup (Scan appearance).
4. Scan Appearance
Description
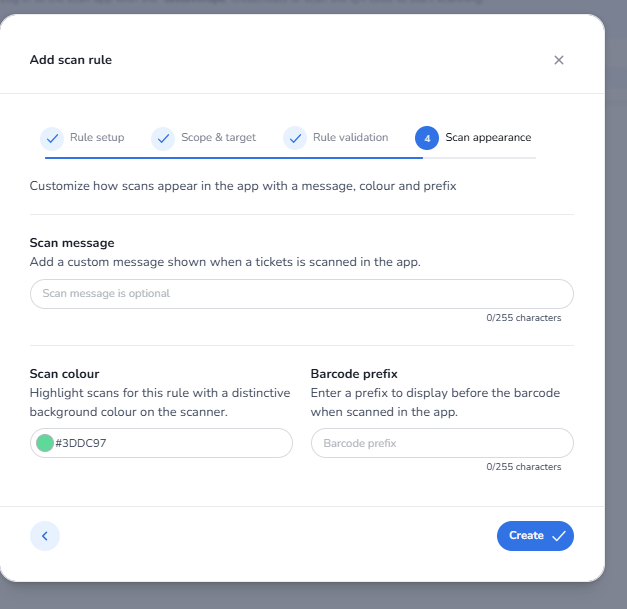
This screen appears in step 4 of creating a scan rule within an Entrance Plan in Entrance Management.
This step allows you to customize how scans appear in the scanning app. You can configure a message, color, and barcode prefix that will be displayed when a ticket is scanned.
These settings help scanning staff quickly recognize what type of ticket has been scanned and whether the scan belongs to a specific entrance rule.
Main Fields and Functions
Scan message
Allows you to add a custom message that appears in the scan app when a ticket is successfully scanned.
This can be helpful to give scanning staff additional information about the ticket.
Example uses:
-
“VIP Entrance”
-
“Staff Access”
-
“Backstage Access”
-
“Day Ticket Valid”
This helps staff immediately understand what type of ticket is being scanned and where the visitor should go.
Scan colour
Defines the background color displayed in the scan app when the ticket is scanned.
Using different colors helps scanning staff quickly recognize different ticket types or access levels without needing to read detailed information.
Example:
-
Green → Regular entry tickets
-
Gold → VIP tickets
-
Blue → Staff access
This is especially helpful at busy entrances or large events, where staff need to identify ticket types quickly.
Barcode prefix
Allows you to add a prefix that appears before the barcode number in the scanning app.
This helps identify the type of ticket or product that was scanned.
Example:
-
VIP-→ VIP tickets -
STAFF-→ Staff passes -
MEDIA-→ Media access
This makes it easier for scanning staff to recognize ticket categories directly in the scanning interface.
Navigation
Back arrow
Returns to the previous step (Rule validation).
Create
Creates and saves the scan rule with the configured settings.
After all this you can create scan rule